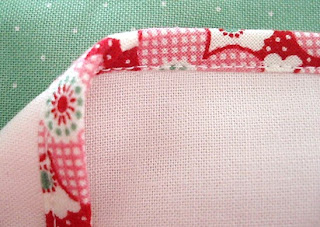
 Press the bias raw edge towards the seam allowance raw edge, leaving a little gap between them.
Bias Binding is a strip of material cut on the bias for extra stretch and often doubled. It is used for binding hems, interfacings or for edge decoration and is very useful for many sewing projects. It adds a touch of embellishment to set your garment or project apart for a more professional appearance. You can purchase ready-made bias or make your own. Bias-making tools are helpful and efficient, but a good steam iron is the necessary tool! I personally prefer to make my own because I can customize it to my project, but some of the old-fashioned vintage unused packages can be quite fun to put to use, too! The focus of this tutorial will be set around making your own bias.
For a 1/4"-wide finished binding, you'll need to start with 1"-wide bias strips, for a 3/8”-wide finished binding, you’ll need to start with 1½”-wide bias strips, and for 1/2"-wide finished binding, you'll need 2"-wide bias strips). The following illustrations will show how you can enclose the raw edges of your seam allowances using your regular presser foot on your sewing machine or by way of an old Singer Attachment.
I prefer a 1/4" wide finished binding, so my illustrations will reflect using 1"-wide bias strips. Stitch your seam as directed in your pattern instructions - with Oliver + S, this is a 1/2 inch seam allowance. To follow with binding, trim the seam allowances to about 3/16 inch. Press a crisp fold in the bias towards the seam allowance raw edge as shown in the illustration above - but leave a narrow gap between the raw edge of the bias and the raw edges of the seam allowance. Leaving the little gap will make for a smooth, crisp edge when it is folded over and stitched in the final pass.
 Stitching the bias-binding in place
 Bias is fed, folded, stitched and bound in place
The Bias Strip is guided through the attachment while simultaneously being folded, stitched in place and enclosing the raw edge of the seam allowances. You can use this attachment for a variety of bias-width cuts, but the maximum width allowed through the binder is 15/16".

 Inside seam showing a bound seam allowance
 Press the seam allowance in the proper direction for a professional finish
 Stitching the bias-binding in place
Fold and press the folded bias over the raw edge and stitch in place. Trimming your seam allowances will help to ensure that your previous stitching lines are covered within the bias as it is folded over and stitched.
 Finished bound seam

 Finished bound seam
This method is particularly useful for finishing seams on heavier fabrics. (Be sure to choose a very lightweight cotton such as lawn or batiste so as not to add any unnecessary bulk at the seam allowances.) Using a contrasting fabric adds that last finished touch to the inside of a garment - such as this Sunday Brunch Jacket I made for my daughter.
The following illustrations are shown using an old Singer Binder Attachment and 15/16" wide bias strips. (A little bit of trivia: Remember, the tutorial illustrating the Singer Hand-Crank Pinker? Using a straight-edge disk, the cutting guide was specifically designed for 15/16" maximum width cut for this very purpose!) A Singer Binder was included as a standard basic attachment with most vintage Singer Sewing Machines but are still useful for today. If you want to avoid the extra steps of pressing - this attachment will aid in stitching, folding, and binding the raw edges all at one time. Granted, it does take a bit of practice to get the feel and direction to hold the bias strips correctly, but there is something fun about using tools from days gone by.

Binding a seam using a Singer Binder Attachment
The engineering of this attachment basically allows only for traditional cotton quilting wovens to be used but is particularly helpful for quickly binding seams or binding the edge of a single layer piece of fabric (I.e. Aprons, ties or sashes, bibs, collars, etc.) all in one pass. You will find more ideas and samples at April1930s.Com. Bias is fed, folded, stitched and bound in place
The Bias Strip is guided through the attachment while simultaneously being folded, stitched in place and enclosing the raw edge of the seam allowances. You can use this attachment for a variety of bias-width cuts, but the maximum width allowed through the binder is 15/16".

 Inside seam showing a bound seam allowance
When you are finished, be sure to press the seam allowance in the proper direction as directed in your pattern instructions.
 Press the seam allowance in the proper direction for a professional finish

1 comment:
Hi April..happy New Year.
Have you ever worked with oilcloth before? What projects are on the horizon?
I hope things are going well for your family.
Cindy from Rick-Rack and Gingham
Post a Comment